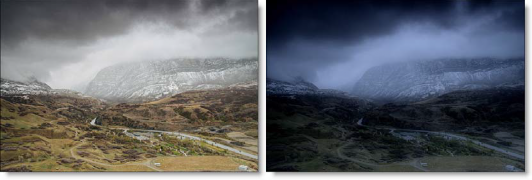
NEW IN CONTINUUM 2021, the BCC+ Day for Night filter simulates a technique used for shooting exteriors in daylight made to look like they were photographed at night. Typically, it involves underexposing by two to two-and-a-half stops and using a filter to provide a tint, that is often a lavender-blue, as it mimics twilight and appears to emulate the mood of moonlight.

Presets and the FX Editor
To select from a selection of factory installed and user-generated presets, open the FX Editor interface and pick one from the Presets window.
Filter Parameters
Diffusion
- Blur: Sets how much the image is diffused.
- Opacity: Sets the amount of diffusion mixed into the original image. The higher the setting, the more the image is blurred.
Moonlight
- Color: The Color parameter sets the color of the moonlight through the use of a standard color picker. The default color is blue.
- Opacity: Sets the opacity of the moonlight color.
- Preserve Highlights: Preserves the white areas of the image.
- Exposure Compensation: Exposure Compensation adds back the brightness loss as a result of the color application.
Color Correct
- Hue: Rotates the hue of the image.
- Saturation: Adjusts the saturation of the image. Positive values saturate, negative values desaturate.
- Brightness: Adjusts the brightness of the image. Positive values brighten, negative values darken.
- Contrast: Adjusts the contrast of the image. Positive values increase contrast, negative values decrease contrast.
- Gamma: Adjusts the gamma of the image. The gamma adjustment leaves the white and black points the same and only modifies the values in-between. Positive values lighten the midtones, negative values darken the midtones.
- Temperature: Sets the color of the image to be either warmer or cooler. Dragging the slider to the right makes the image cooler (bluer) and dragging the slider to the left makes the image warmer (redder).
- Cyan/Magenta: Adds either Cyan or Magenta to the image. Dragging the slider to the right makes the image more magenta and dragging the slider to the left makes the image more cyan.
- Red: Adds or subtracts red from the image.
- Green: Adds or subtracts green from the image.
- Blue: Adds or subtracts blue from the image.
Working with The Filter
- Apply BCC+ Day for Night from the BCC Film Styles unit category.
- Click the BCC FX Editor button from the Effects and Presets banner.The FX Editor user interface opens and consists of Presets, Parameters and Viewer windows.
- Try out some of the presets.
- Adjust the Diffusion > Blur and Opacity parameters to your liking.The Day for Night effect relies on a blue tint to simulate moonlight. You can modify the color of the tint as well as its intensity using the Moonlight controls.
- Use the Moonlight controls to adjust the tint applied to the image.Photographically the image is underexposed by two stops or so. We duplicate the underexposure by using a combination of color correction controls. Modify the color correct presets brighter or darker depending on your image.
- Change the Color Correct settings if necessary.
- Click the Apply button to return to the host application.
The values of the parameter adjustments in the FX Editor user interface are transferred to your host application.