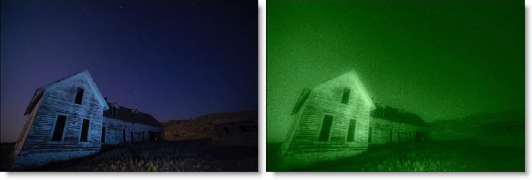
NEW IN CONTINUUM 2021 the BCC+ Night Vision filter creates the effect of a Night Vision lens–that green, glowy, grainy look.

Photo by Thomas Shellberg on Unsplash
Presets and the FX Editor
To select from a selection of factory installed and user-generated presets, open the BCC+ FX Editor interface and pick one from the Presets window.
Filter Parameters
View: Allows you to set the viewer to display various outputs for the Color Shadow.
- Output: Shows the default look of the BCC Night Vision filter on the image.
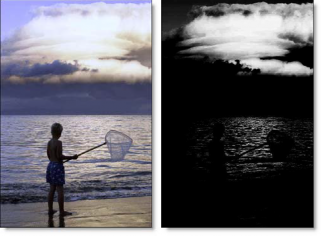
- Matte: Shows the glow matte. Useful when determining the look of the glow used in the output.
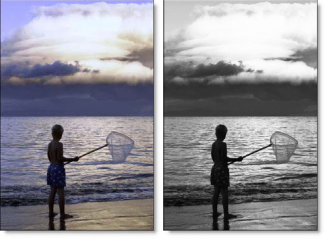
Black and White: Select the type of black and white filter to be applied to your color image.
- Normal: Converts the color image to a monochrome image.
- Red: Simulates a red filter in black and white photography.
- Green: Simulates a green filter in black and white photography.
- Blue: Simulates a blue filter in black and white photography.
- Yellow: Simulates a yellow filter in black and white photography.
- Orange: Simulates an orange filter in black and white photography.
The Tint parameter group contains options for adjusting the amount and color of the tinting.
- Color: Sets the color that the image will be tinted with. The color is preset to a night vision green, but feel free change it by using the color picker.
- Opacity: Sets the opacity of the tint color. Higher values will result in a more intense tint.
The Glow parameter group contains options for adjusting the look of the glow present in the image.
Blend: Determines the blend mode to be used to create the glow effect.
- Add: The glow is added to your image.
- Screen: The glow is combined with the image using a Screen blend mode. This looks kind of like the Add blend mode, but highlights are retained.
Brightness: Sets the intensity of the glow.
Blur: Sets the softness of the glow.
Additional Controls
The Grain parameter group contains options for adding and modifying the intensity of grain noise in the image.
- Grain Size: Controls the size of the grain. Please note that you may not see an accurate representation of the grain in the viewer unless your timeline/composition is set to high quality and the viewer is set to a 1:1 pixel ratio.
- Grain Amount: Controls the intensity of the grain.
- Grain Softness: Controls the softness of the edges of the grain samples. Higher values will result in a softer, blurrier noise pattern, while lower values will result in a sharper noise pattern.
The Color Correct parameters allow you to fine tune the brightness, contrast and gamma of the image prior to any adjustments to the black and white or glow parameters.
- Brightness: Adjusts the brightness of the image. Positive values brighten, negative values darken.
- Contrast: Adjusts the contrast of the image. Positive values increase contrast, negative values decrease contrast.
- Gamma: Adjusts the gamma of the image. The gamma adjustment leaves the white and black points the same and only modifies the values in-between. Positive values lighten the midtones, negative values darken the midtones.
The Matte parameter group controls consist of Position, Range and Blur parameters. The white areas of the matte are the areas that will be affected by the filter, while the black areas remain unaffected. The matte is extracted based on luminance, in most cases, and is created using the Position and Range parameters.
- Position: Selects the values to be included in the matte. A higher Position value shows more white values from the original image as white values in the matte. A lower Position value shows more black values from the original image as white values in the matte.

Position 100, Range 25
- Range: Controls the range of values to be used for the matte. Once you’ve selected the “Position”, you can then add or subtract the “Range” of values to be included in the matte. A higher Range value includes more white values in the matte while a lower Range value includes less values in the matte.

Position 100, Range 75
- Blur: The matte is blurred by a quality blur.
Working with The Filter
- Apply BCC Night Vision from the BCC Art Looks unit category.
- Click the BCC FX Editor button from the Effects and Presets banner.The FX Editor user interface opens and consists of Presets, Parameters and Viewer windows.
- Try out some of the presets.
- In the Presets window, choose a new preset group from the pop-up menu to see a different set of filter presets.
- Choose the type of black and white filter to be applied to your color image from the Black and White pop-up menu.The type of Black and White filter that you choose can dramatically change the look of your image.
- Adjust the Glow > Brightness and Blur as well as the Grain > Size and Amount settings to your liking.Note: You may not see an accurate representation of the grain in the viewer unless your timeline/composition is set to high quality and the viewer is set to a 1:1 pixel ratio.
- If you want, you can use the Color Correct controls to modify the color of the image.In some of the filters, a matte is generated to create the desired effect–in this case, glow.
- Change your View to Matte to see the matte values.The areas that are white in the matte are the areas where glow will be introduced. The location of the glow within the scene can be adjusted by modifying the Matte > Position and Range parameters.
- Change the Matte > Position parameter if you want to select different values to be used for the matte.
- Increase the Matte > Range control to add more values to the matte. Decrease for less values.
- Increase the Matte > Blur parameter to soften the transition areas of the matte.
- Change your View to Output to see the filtered image.
- Click the Apply button to return to the host application.
The values of the parameter adjustments in the FX Editor user interface are transferred to your host application.